Hi!
Before I start to share my experience in setting up my Samsung Galaxy Note II with IntelliJ IDEA (my IDE), kindly find other resources which might help you connect your android device to your IDE.
http://developer.android.com/tools/device.html
http://developer.android.com/tools/extras/oem-usb.html
Before I start to share my experience in setting up my Samsung Galaxy Note II with IntelliJ IDEA (my IDE), kindly find other resources which might help you connect your android device to your IDE.
http://developer.android.com/tools/device.html
http://developer.android.com/tools/extras/oem-usb.html
Here we go!
There are essentially 3 things you need to do:
- Enable Debugging Mode on your android phone.
- Install usb drivers for adb on your computer.
- Amend ApplicationManifest.xml file (IntelliJ IDEA) or build.gradle file (Android Studio)
Step 1 - Enabling Debugging Mode
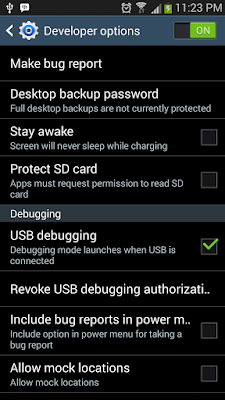
The Developer options is required to enable Debugging Mode, however, in Android 4.2 and above it is hidden by default.
In Android 4.3, go to Settings > More > About device and tap Build number seven times to make the Developer options visible. Return to the previous screen to find the Developer options visible at the bottom.
Ensure the Developer options is ON and USB debugging enabled
Step 2 - Install USB Driver
Kindly refer to the link http://developer.android.com/tools/extras/oem-usb.html for usb driver specific to your phone or check your manufacturers website.
In my case, although Samsung was listed on the developer.android.com page, I use Samsung Kies to install the required drivers.
Connect your phone to your computer through a usb cable and Windows would automatically install basic usb drivers.
Launch Samsung Kies on your computer then select Tools > Reinstall device driver to install the all drivers.
On your computer, click on the Start icon then type "Device Manager". Select Device Manager from the list.
Your device should be identified under the Portable Devices with no warning.
You may also find an RSA key message on your phone asking to allow debugging through this computer, just accept that.
In build.gradle file, the approach is slightly different (for those using Android Studio).
Kindly find an illustration below.
Thanks for finding the time to read this.
If you find this article helpful, share it, follow me and drop a comment - you could also suggest other ways to improve our lives just in case I missed anything. :)
Hearty Regards
Launch Samsung Kies on your computer then select Tools > Reinstall device driver to install the all drivers.
On your computer, click on the Start icon then type "Device Manager". Select Device Manager from the list.
Your device should be identified under the Portable Devices with no warning.
You may also find an RSA key message on your phone asking to allow debugging through this computer, just accept that.
Step 3 - Amend AndroidManifest
In the ApplicationManifest.xml file, add android:debuggable ="true" in the <application> element and suppress the warning by adding xmlns:tools="http://schemas.android.com/tools" in the <manifest> element.In build.gradle file, the approach is slightly different (for those using Android Studio).
Kindly find an illustration below.
ApplicationManifest.xml file
<manifest xmlns:android="http://schemas.android.com/apk/res/android" xmlns:tools="http://schemas.android.com/tools" package="course.examples.maplocation" android:versionCode="1" android:versionName="1.0" > <application android:debuggable="true" ... >Build.gradle file
android { buildTypes { debug { debuggable true }
That's it!
You should find your device listed when you try to run your application, however, ensure in your application configuration, the Target Device is either set to Show chooser dialog or USB device else your application would run on the default emulator.| A physical Samsung Note II device shown on the list of devices |
Thanks for finding the time to read this.
If you find this article helpful, share it, follow me and drop a comment - you could also suggest other ways to improve our lives just in case I missed anything. :)
Hearty Regards
